ツールバー
toolbar要素
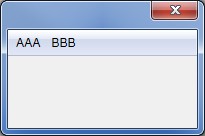
<toolbox>
  <toolbar>
    <toolbarbutton label="AAA" />
    <toolbarbutton label="BBB" />
  </toolbar>
</toolbox>
ツールバー - XUL | MDN
これは次のように表示されます。
なお、toolbox要素はtoolbar要素のコンテナです。toolbox内に配置しなくてもtoolbarは機能しますが、たいていこのような構成とします。
toolbarbutton要素
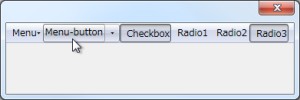
type属性
- menu … 右側に矢印が表示され、全体がボタンとなる。
- menu-button … 右側に矢印が表示され、その部分がボタンとなる。
- checkbox
- radio
<toolbox>
  <toolbar>
    <toolbarbutton label="Menu"        type="menu" />
    <toolbarbutton label="Menu-button" type="menu-button" />
    <toolbarbutton label="Checkbox"    type="checkbox" />

    <toolbarbutton label="Radio1" type="radio" group="foo" />
    <toolbarbutton label="Radio2" type="radio" group="foo" />
    <toolbarbutton label="Radio3" type="radio" group="foo" />
  </toolbar>
</toolbox>
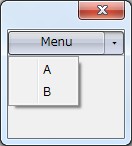
menupopup
ボタンのクリックによりメニューを表示するには、toolbarbuttonのtype属性をmenuかmenu-buttonとして、その要素内にmenupopup要素を配置します。
<toolbox>
  <toolbarbutton label="Menu" type="menu-button">
    <menupopup>
      <menuitem label="A" value="foo" />
      <menuitem label="B" value="bar" />
    </menupopup>
  </toolbarbutton>
</toolbox>
参考
- toolbox - XUL | MDN
- toolbar - XUL | MDN
- toolbarseparator - XUL | MDN (アイテム間の区切り)
- toolbarspacer - XUL | MDN (アイテム間のスペース)
- toolbarspring - XUL | MDN (アイテム間の可変スペース)
- toolbar - XUL | MDN
ブラウザのツールバーへの配置
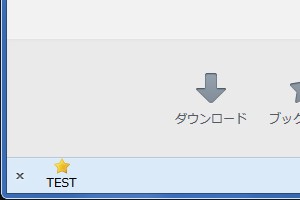
ブラウザのウィンドウに表示するためには、toolbarpalette要素のid属性はBrowserToolbarPaletteとします。また、ツールバーの表示方法で「アイコンとテキスト」が選択されたときに適切な配置で表示されるように、toolbarbutton要素のclass属性はtoolbarbutton-1とします。
<toolbarpalette id="BrowserToolbarPalette">
  <toolbarbutton id="testToolButton"
      class="toolbarbutton-1"
      label="TEST"
      tooltiptext="sample button"
      oncommand="alert('ABC')" />
</toolbarpalette>
これをXUL文書に記述するときは、このtoolbarpalette要素はoverlay要素の直接の子要素とします。window要素の子要素とすると機能しません。
スタイルに指定するtoolbarbutton-1の定義はchrome://browser/skin/browser.cssにあり、その一部は次のような内容です。
.findbar-button,
#nav-bar .toolbarbutton-1,
#nav-bar .toolbarbutton-1 > .toolbarbutton-menubutton-button {
  -moz-appearance: none;
  border: none;
  padding: 0;
  background: none;
}
またchromeclass-toolbar-additionalのそれは、chrome://global/content/xul.cssにあります。
/* ::::::::::
   :: Rules for 'hiding' portions of the chrome for special
   :: kinds of windows (not JUST browser windows) with toolbars
   ::::: */

window[chromehidden~="menubar"] .chromeclass-menubar,
window[chromehidden~="directories"] .chromeclass-directories,
window[chromehidden~="status"] .chromeclass-status,
window[chromehidden~="extrachrome"] .chromeclass-extrachrome,
window[chromehidden~="location"] .chromeclass-location,
window[chromehidden~="location"][chromehidden~="toolbar"] .chromeclass-toolbar,
window[chromehidden~="toolbar"] .chromeclass-toolbar-additional {
  display: none;
}
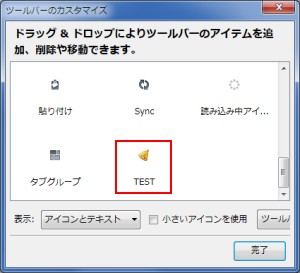
ツールバーボタンの画像
まずボタンの画像を用意します。この画像には大小2種類が必要です。Icon size - Creating toolbar buttons (Customize Toolbar Window) - Mozilla | MDN
- 大きいアイコン … 24 x 24px
- 小さいアイコン … 16 x 16px
ちなみにアドオンのアイコンとなる、アドオンマネージャのアイコンとAMOでの公開用のアイコンは、これとはまた異なるサイズとなります。
画像の配置
ボタンに画像を表示するにはスタイルシートで指定します。IDセレクタの値には、toolbarbutton要素のid属性の値を指定します。
/* 通常のアイコン */
#testToolButton {
  list-style-image: url( chrome://myPackage/skin/star.png );
}
/* [小さいアイコンを使用]が選択されたときのアイコン */
toolbar[iconsize="small"] #testToolButton {
  list-style-image: url( chrome://myPackage/skin/bell.png );
}
そして、このスタイルシートが「ブラウザ」と「ツールバーのカスタマイズ」ウィンドウにオーバーレイされるように指定します。Applying the stylesheet - Creating toolbar buttons (Customize Toolbar Window) - Mozilla | MDN
これをchrome.manifestで指定するならば、次のように記述します。
# ブラウザ ウィンドウ
style chrome://browser/content/browser.xul chrome://myPackage/skin/bar.css

# ツールバーのカスタマイズ ウィンドウ
style chrome://global/content/customizeToolbar.xul chrome://myPackage/skin/bar.css
ブラウザへのオーバーレイはクロスパッケージ オーバーレイでも行えるため、それでオーバーレイしたXUL文書からxml-stylesheet処理命令で読み込む方法もあります。それにはchrome.manifestで次のようにオーバーレイを指示し、
overlay chrome://browser/content/browser.xul chrome://myPackage/content/sample.xul
XUL文書では、次のようにCSSファイルを読み込みます。
<?xml-stylesheet type="text/css" href="chrome://myPackage/skin/bar.css"?>
イベントハンドラの登録
ツールバーボタンのイベントは、必ず属性イベントリスナで登録します。それはtoolbarbutton要素がツールバーに表示されていない状態では、getElementById()などでノードを取得できず、スクリプトからイベントを登録できないためです。