WinDbg (Windows Debugger)
導入
ダウンロード
WinDbgはDebugging Tools for Windowsに含まれます。そしてこれはWindows SDKに含まれるため、それをダウンロードします。
Download: Microsoft Windows SDK 7.1 - Microsoft Download Center - Download Details
Visual Studio 2015ではセットアップファイルからインストールできるため、別途ダウンロードは不要です。それにはコントロール パネルの[プログラムのアンインストール]でVisual Studioを選択し、[変更]を選択します。セットアップが起動したら[変更]を選択し【Windows 開発と Web 開発 → ユニバーサル Windows アプリ開発ツール (Universal Windows App Development Tools) → Windows 10 SDK】にチェックを入れ、[更新]をクリックします。Installing Windows 10 SDK into Visual Studio
インストール
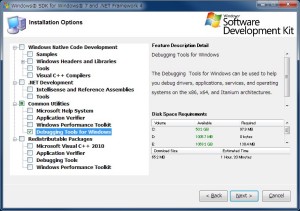
「Installation Options」で、「Debugging Tools for Windows」を選択します。
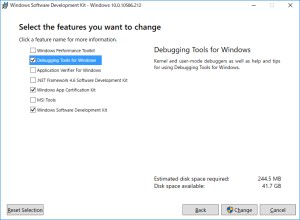
Windows 10 SDKではコントロールパネルの[プログラムのアンインストール]で[Windows Software Development Kit - Windows 10]を選択し、[変更]を選択します。そして[Select the features you want to change]で[Debugging Tools for Windows]にチェックを入れ、[Change]をクリックします。windows - How to install WinDbg when VS 2015 is already installed? - Stack Overflow
インストールの失敗
インストール失敗時に、ログに
vcredist_x64.exe installation failed with return code 5100
のように記録されることがあります。このときには「Microsoft Visual C++ 2010 x64 Redistributable」をアンインストールすることで、Debugging Toolsをインストールできるようになります。Error installing Windows 7 SDK 7.1 with VS2008, VS2010 Premium on Win 7 32bit
なおアンインストールした「Visual C++ 2010 Redistributable」は、Debugging Toolsのインストール時に自動的に再インストールされます。
フォント
メニューの【View → Font】から変更できます。その設定を次回の起動時以降も維持したいならば、メニューの【File → Save Workspace】でワークスペースに保存します。
シンボル ファイル (symbol file)
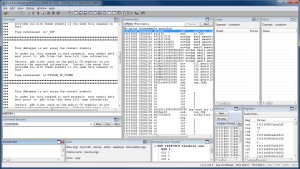
シンボル ファイルが正しく設定されていないと、
*********************************************************************
* Symbols can not be loaded because symbol path is not initialized. *
*                                                                   *
* The Symbol Path can be set by:                                    *
*   using the _NT_SYMBOL_PATH environment variable.                 *
*   using the -y <symbol_path> argument when starting the debugger. *
*   using .sympath and .sympath+                                    *
*********************************************************************
*************************************************************************
***                                                                   ***
***                                                                   ***
***    Your debugger is not using the correct symbols                 ***
***                                                                   ***
***    In order for this command to work properly, your symbol path   ***
***    must point to .pdb files that have full type information.      ***
***                                                                   ***
***    Certain .pdb files (such as the public OS symbols) do not      ***
***    contain the required information.  Contact the group that      ***
***    provided you with these symbols if you need this command to    ***
***    work.                                                          ***
***                                                                   ***
***    Type referenced: nt!XX                                         ***
***                                                                   ***
*************************************************************************
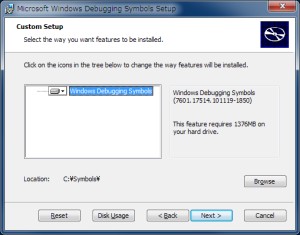
のように表示されます。このような場合には使用しているOSに適したファイルをダウンロードし、インストールします。
シンボル パス (symbol path)
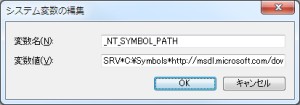
環境変数に設定します。変数名は「_NT_SYMBOL_PATH」で、変数値を
SRV*c:\symbols*https://msdl.microsoft.com/download/symbolsSymbol Path | MSDN
のようにします。このときc:\symbolsには、シンボルファイルを保存するパスを指定します。
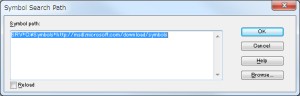
またはWinDbgのメニューの【File → Symbol File Path】で設定します。
コマンド
x
指定のパターンに一致する、シンボルを確認できます。
x [Options] Module!Symbol
たとえばmymoduleのすべてのシンボルをaddressの昇順で表示するには、次のようにします。
x /a mymodule!*
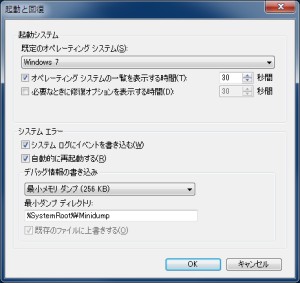
Windowsのダンプ ファイル (dump file)
既定では%SystemRoot%/Minidumpに.dmpの拡張子で保存されます。Windows でデバッグ用に作成された最小メモリ ダンプ ファイルを読み取る方法
参考
参考書
- .NET&Windowsプログラマのためのデバッグテクニック徹底解説 [日経BP] John Robbins
8章「WinDBGと高度なネイティブコードデバッグ技術」で、WinDbgについて解説されています。