グラフィック
Graphicsクラス
Graphicsオブジェクトの取得
Graphicsオブジェクトのコンストラクタはpublicではないため、newでは作成できません。よって他の方法によって取得する必要があります。
ControlのPaintイベントのハンドラから
Controlの派生クラスに描画するときには、そのPaintイベントのPaintEventArgsから取得できます。
private void Form1_Paint( object sender, PaintEventArgs e )
{
    Graphics g = e.Graphics;
    g.DrawLine( Pens.Black, 0, 0, 10, 20 );
}
Controlのメソッドから
Controlの派生クラスでPaintイベント以外で描画するには、そのクラスのCreateGraphics()を呼び出します。
Graphics g = CreateGraphics();
g.DrawLine( Pens.Black, 0, 0, 10, 20 );
Graphicsのメソッドから
特定のImageに描画するならば、Graphics.FromImage()からそれを操作できるGraphicsを取得できます。
Image image = Image.FromFile("sample.bmp");

Graphics g = Graphics.FromImage(image);
g.DrawLine(Pens.Black, 0, 0, 10, 20);
Graphics.FromImage(Image) メソッド (System.Drawing) | Microsoft Learn
このときImageがインデックス付きのピクセル形式 (indexed pixel format) である
- Format1bppIndexed
- Format4bppIndexed
- Format8bppIndexed
だと、「インデックス付きのピクセル形式をもつイメージからグラフィックス オブジェクトを作成することはできません。」としてExceptionが投げられます。また
- Format16bppArgb1555
- Format16bppGrayScale
だと「メモリが不足しています。」としてOutOfMemoryExceptionが投げられます。
Bitmap bitmap = new Bitmap(1, 1, PixelFormat.Format16bppGrayScale);
Graphics g = Graphics.FromImage(bitmap); // OutOfMemoryException
プロパティ
| 型 | プロパティ | 内容 |
|---|---|---|
| Region | Clip | クリッピング領域を表すRegion |
| RectangleF | ClipBounds | クリッピング領域に、外接する四角形を表すRectangleF |
| RectangleF | VisibleClipBounds | 表示クリッピング領域に、外接する四角形を表すRectangleF |
| SmoothingMode | SmoothingMode | レンダリングの品質 |
| InterpolationMode | InterpolationMode | 補間モード |
InterpolationMode
補間モード (interpolation mode) によって、2つの終点の中間値の計算方法を指定できます。これは画像を拡大/縮小と回転させるときのアルゴリズムを決定し、画像の品質と処理速度に影響します。
画像を高品質に拡大/縮小するには?:.NET TIPS - @IT 遠藤孝信 (2003/05/02)| Invalid | -1 | Equivalent to the Invalid element of the QualityMode enumeration. | |
| Default | 0 | Specifies default mode. | |
| Low | 1 | Specifies low quality interpolation. | |
| High | 2 | Specifies high quality interpolation. | |
| Bilinear | 3 | Specifies bilinear interpolation. | 事前フィルタは実行されない。元サイズの50%未満に縮小するのには適さない |
| Bicubic | 4 | Specifies bicubic interpolation. | 事前フィルタは実行されない。元サイズの25%未満に縮小するのには適さない |
| NearestNeighbor | 5 | Specifies nearest-neighbor interpolation. | |
| HighQualityBilinear | 6 | pecifies high-quality, bilinear interpolation. | 高品質の縮小を確かとするため、事前フィルタが実行される |
| HighQualityBicubic | 7 | Specifies high-quality, bicubic interpolation. | 高品質の縮小を確かとするため、事前フィルタが実行される。このモードでは、最高品質で変換された画像が生成される |
Bitmap bitmap = new Bitmap(100, 100);
Graphics g = Graphics.FromImage(bitmap);
InterpolationMode mode = g.InterpolationMode; // Bilinear
座標系の変換
- ワールド変換 (ワールド座標 → ページ座標)
- TranslateTransform()
- ScaleTransform()
- RotateTransform()
- ページ変換 (ページ座標 → デバイス座標)
- PageUnit
- PageScale
ワールド変換
public void TranslateTransform(
    float dx, // x軸方向の移動量
    float dy  // y軸方向の移動量
)
Graphics.TranslateTransform メソッド (Single, Single) (System.Drawing) | MSDN
public void ScaleTransform(
    float sx, // x軸方向の拡大率
    float sy  // y軸方向の拡大率
)
Graphics.ScaleTransform メソッド (Single, Single) (System.Drawing) | MSDN
拡大率を負数とすることで、軸を反転できます。たとえばsyを-1.0とするとy軸の正の方向が上向きとなり、グラフの描画に便利です。ただし軸を反転させるだけではy軸の正の領域が描画範囲から外れるため、必要ならばTranslateTransform()でy軸方向に移動させます。
スケールを変更すると直線などの幅にも影響するため、それが期待するものでなければペンの幅を0.0とします。
public void RotateTransform(
    float angle // 回転角度
)
Graphics.RotateTransform メソッド (Single) (System.Drawing) | MSDN
Imageを継承したクラスを90度単位で回転させるならば、RotateFlip()で可能です。
原点の変更
たとえばフォーム左下が(-1.0,-1.0)、右上が(1.0,1.0)で、中央が(0,0)となるように座標を変換するには、次のようにします。
float width = 2.0f;
float height = -2.0f;

Graphics g = e.Graphics;
g.ScaleTransform(form.ClientSize.Width / width, form.ClientSize.Height / height);
g.TranslateTransform(width / 2.0f, height / 2.0f); // フォームの中央が(0,0)となるように移動


using (Pen pen = new Pen(Color.Black, 0.0f))
{
    g.DrawLine(pen, -1.0f, 0.0f, 1.0f, 0.0f); // x軸の描画
    g.DrawLine(pen, 0.0f, -1.0f, 0.0f, 1.0f); // y軸の描画
}
グローバル変換とローカル変換
- グローバル変換 … Graphicsオブジェクトで描画し、すべての項目に適用
- ローカル変換 … GraphicsPathオブジェクトなどで描画し、特定の項目に適用
グローバル変換 (Global Transformations)
前述の、Graphics.TranslateTransform()メソッドなどで変換します。
ローカル変換 (Local Transformations)
GraphicsPathに直線セグメントなどを追加し、それに変換行列を乗じます。そしてGraphics.DrawPath()などで描画します。ローカル変換 - グローバル変換とローカル変換 | MSDN
GraphicsPath graphicsPath = new GraphicsPath();
graphicsPath.AddLine(10, 20, 10, 40);

Matrix matrix = new Matrix();
matrix.Scale(2.0f, 1.0f);
matrix.Translate(0.0f, -1.0f);
graphicsPath.Transform(matrix);

Graphics g = e.Graphics;

Pen pen = new Pen(ForeColor);
g.DrawPath(pen, graphicsPath);
図形の描画
| メソッド | 描画される図形 |
|---|---|
| DrawArc() | 円弧 |
| DrawBezier() | ベジェ曲線 (ベジエ スプライン (Bézier spline)) |
| DrawBeziers() | ベジェ曲線。一連の (ベジエ スプライン (Bézier spline)) |
| DrawClosedCurve() | カーディナル スプライン。閉じた (Cardinal spline) |
| DrawCurve() | カーディナル スプライン。配列を通過する (Cardinal spline) |
| DrawEllipse() | 楕円 |
| DrawIcon() | アイコン (Icon)。スケーリングされた |
| DrawIconUnstretched() | アイコン (Icon)。スケーリングされていない |
| DrawImage() | イメージ (Image)。スケーリングされた |
| DrawImageUnscaled() | イメージ (Image)。スケーリングされていない。つまり元のサイズ |
| DrawImageUnscaledAndClipped() | イメージ (Image)。スケーリングされず切り取り (クリッピング) された |
| DrawLine() | 直線。2つの点を結ぶ |
| DrawLines() | 線分。配列を接続する |
| DrawPie() | 扇形 |
| DrawPolygon() | 多角形。配列で定義された |
| DrawRectangle() | 四角形 |
| DrawRectangles() | 四角形。一連の |
| DrawString() | 文字列 |
| DrawPath() | GraphicsPathの図形 |
| メソッド | 描画される図形 |
|---|---|
| FillClosedCurve() | カーディナル スプライン。閉じた |
| FillEllipse() | 楕円 |
| FillPie() | 扇形 |
| FillPolygon() | 多角形 |
| FillRectangle() | 四角形 |
| FillRectangles() | 四角形。一連の |
| FillRegion() | 四角形とパスから成る図形 |
| FillPath() | GraphicsPathの図形 |
直線の描画
1本の直線はDrawLine()で、連続した直線はDrawLines()で描画します。また終了点を開始点に接続するならば、DrawPolygon()を用います。
public void DrawLine(
    Pen pen,
    int x1,
    int y1,
    int x2,
    int y2
)
Graphics.DrawLine メソッド (Pen, Int32, Int32, Int32, Int32) (System.Drawing) | MSDN
public void DrawLines(
    Pen pen,
    Point[] points
)
Graphics.DrawLines メソッド (Pen, Point[]) (System.Drawing) | MSDN
Graphics g = e.Graphics;

Pen pen1 = new Pen(ForeColor);
g.DrawLine(pen1, 10, 0, 20, 30);

Point[] points = {
    new Point(10,0),
    new Point(20,30),
    new Point(0,10),
};

Pen pen2 = new Pen(ForeColor);
g.DrawLines(pen2, points);
public void DrawPolygon(
    Pen pen,
    Point[] points
)
Graphics.DrawPolygon メソッド (Pen, Point[]) (System.Drawing) | MSDN
楕円の描画
public void DrawEllipse(
    Pen pen,
    int x,
    int y,
    int width,
    int height
)
public void DrawEllipse(
    Pen pen,
    Rectangle rect
)
Graphics.DrawEllipse メソッド (System.Drawing) - desc | MSDN
たとえばフォームのクライアント領域に内接する円を描くならば、次のようにします。
Graphics g = e.Graphics;
g.DrawEllipse(Pens.Red, form.ClientRectangle);
四角形の描画
public void DrawRectangle(
    Pen pen,
    int x,     // 描画する四角形の左上のx座標
    int y,     // 描画する四角形の左上のy座標
    int width, // 描画する四角形の幅
    int height // 描画する四角形の高さ
)
Graphics.DrawRectangle メソッド (Pen, Int32, Int32, Int32, Int32) (System.Drawing) | MSDN
public void FillRectangle(
    Brush brush,
    int x,     // 塗りつぶす四角形の左上のx座標
    int y,     // 塗りつぶす四角形の左上のy座標
    int width, // 塗りつぶす四角形の幅
    int height // 塗りつぶす四角形の高さ
)
Graphics.FillRectangle メソッド (Brush, Int32, Int32, Int32, Int32) (System.Drawing) | MSDN
DrawRectangle()ではペンの幅が影響するため、描画される位置や幅がFillRectangle()と異なることがあります。
Graphics g = e.Graphics;
g.ScaleTransform(10.0f, 10.0f);

g.FillRectangle(Brushes.Black, 10, 10, 1, 1); // 下図の1列目に描画
g.FillRectangle(Brushes.Black, 10, 20, 2, 2);

g.DrawRectangle(Pens.Black, 20, 10, 1, 1); // 下図の2列目に描画
g.DrawRectangle(Pens.Black, 20, 20, 2, 2);

using (Pen pen = new Pen(Color.Black, 0.0f))
{
    g.DrawRectangle(pen, 30, 10, 1, 1); // 下図の3列目に描画
    g.DrawRectangle(pen, 30, 20, 2, 2);
}
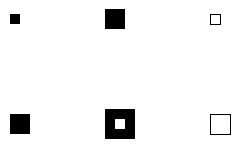
出力例
イメージの描画
DrawImage()
イメージを描画できます。
| メソッド | 描画範囲と形状 |
|---|---|
| DrawImage(Image, Point) | 全体が、元のサイズで描画 |
| DrawImage(Image, Point[]) | 全体が、指定の3点を頂点とする平行四辺形の形状にスケーリングされて描画 |
| DrawImage(Image, Rectangle) | 全体が、指定の四角形の形状にスケーリングされて描画 |
| DrawImage(Image, Rectangle, Rectangle, GraphicsUnit) | 指定部分が、指定の四角形の形状にスケーリングされて描画 |
public void DrawImage(
    Image image,
    Rectangle destRect,
    int srcX,
    int srcY,
    int srcWidth,
    int srcHeight,
    GraphicsUnit srcUnit,             // 切り取り部を定義するための単位
    ImageAttributes imageAttrs,       // 変色とガンマ情報
    Graphics.DrawImageAbort callback, // 描画時に呼び出されるコールバック
    IntPtr callbackData               // このメソッドの停止を決定するためのコールバックの追加データ
)
Graphics.DrawImage メソッド (Image, Rectangle, Int32, Int32, Int32, Int32, GraphicsUnit, ImageAttributes, Graphics.DrawImageAbort, IntPtr) (System.Drawing) | MSDN
imageに問題があると、このメソッドの呼び出しで「コード -1073740940 (0xc0000374) で終了しました。」としてアプリケーションがクラッシュします。
imageAttrsを指定することで、色を変更できます。
- 方法: カラー行列を使用して単一色を変換する - Windows Forms .NET Framework | Microsoft Learn
- 画像のカラーバランスを補正して表示する - .NET Tips (VB.NET,C#...)
DrawImageUnscaled()
このメソッドは内部ではサイズを指定しないDrawImage()を呼ぶだけのため、DrawImageUnscaled(Image, Int32, Int32)はDrawImage(Image, Int32, Int32)を呼ぶことと同義です。DrawImageUnscaled - Graphics.cs
DrawImageUnscaledAndClipped()
画像の一部の切り取り (クリッピング) だけをするならば、スケーリングを伴わないDrawImageUnscaledAndClipped()を用います。
public void DrawImageUnscaledAndClipped(
    Image image,
    Rectangle rect
)
Graphics.DrawImageUnscaledAndClipped メソッド (Image, Rectangle) (System.Drawing) | MSDN
点の描画
点を描画するメソッドは用意されていないため、1ピクセル幅の四角形を描画することで代用します。c# - Draw a single pixel on Windows Forms - Stack Overflow
g.FillRectangle(Brushes.Black, x, y, 1, 1);
またはBitmapを作成し、それのSetPixel()でピクセルの色を指定することで実現します。
Bitmap bitmap = new Bitmap(100, 100);
bitmap.SetPixel(10, 10, Color.Red);

Graphics g = e.Graphics;
g.DrawImage(bitmap, 0, 0);
文字列の描画
public void DrawString (
    string s,
    System.Drawing.Font font,
    System.Drawing.Brush brush,
    System.Drawing.RectangleF layoutRectangle,
    System.Drawing.StringFormat format
    );
DrawString(String, Font, Brush, RectangleF, StringFormat) - Graphics.DrawString Method (System.Drawing) | Microsoft Learn
互換性が問題とならないならば、GDIを用いるTextRenderer.DrawText()を使用します。c# - Graphics.DrawString vs TextRenderer.DrawText?Which can Deliver Better Quality - Stack Overflow
TextRenderer.DrawText()
public static void DrawText (
    System.Drawing.IDeviceContext dc,
    string text,
    System.Drawing.Font font,
    System.Drawing.Rectangle bounds,
    System.Drawing.Color foreColor,
    System.Windows.Forms.TextFormatFlags flags
    );
DrawText(IDeviceContext, String, Font, Rectangle, Color, TextFormatFlags) - TextRenderer.DrawText Method (System.Windows.Forms) | Microsoft Learn
TextFormatFlags flags = TextFormatFlags.HorizontalCenter | TextFormatFlags.VerticalCenter;
TextRenderer.DrawText(e.Graphics, text, font, bounds, foreColor, flags);
flagsにEndEllipsisを指定して省略記号が描画されたとき、再描画時にその領域が対象とならなかったときには、不要となった省略記号がそのまま残ることがあります。
クリッピング領域が適用されるようにするには、flagsでPreserveGraphicsClippingを指定します。
描画される文字列の大きさを取得
public System.Drawing.SizeF MeasureString (
    string text,
    System.Drawing.Font font,
    int width, // 文字列の最大幅
    System.Drawing.StringFormat format
    );
MeasureString(String, Font, Int32, StringFormat) - Graphics.MeasureString メソッド (System.Drawing) | Microsoft Learn
string text = "SAMPLE";
int maxWidth = 100;
StringFormat stringFormat = new StringFormat(StringFormatFlags.NoClip);

SizeF size = e.Graphics.MeasureString(
    text,
    Font,
    maxWidth,
    stringFormat);
// {Width = 49.7499924 Height = 13.4999981}

SizeF size1 = g.MeasureString(text, Font, 50); // {Width = 49.7499924 Height = 13.4999981}
SizeF size2 = g.MeasureString(text, Font, 25); // {Width = 20.80078 Height = 37.4999924}
SizeF size3 = g.MeasureString(text, Font, 10); // {Width = 10 Height = 73.4999847}
SizeF size4 = g.MeasureString(text, Font, 1);  // {Width = 1 Height = 73.4999847}
TextRenderer.MeasureText()でも取得できます。
public static System.Drawing.Size MeasureText (
    string text,
    System.Drawing.Font font,
    System.Drawing.Size proposedSize, // 最大サイズ
    System.Windows.Forms.TextFormatFlags flags
    );
MeasureText(String, Font, Size, TextFormatFlags) - TextRenderer.MeasureText メソッド (System.Windows.Forms) | Microsoft Learn
string text = "SAMPLE";
Size proposedSize = new Size(100, 50);

Size size = TextRenderer.MeasureText(
    text,
    Font,
    proposedSize,
    TextFormatFlags.Default);
文字列を描画したときの大きさを計測する - .NET Tips (VB.NET,C#...)
必要なのが文字単体の大きさならば、Fontのプロパティから得られます。
パスの描画
中抜き (Outline)
パスに文字列を追加できます。
public void AddString (
    string s,
    System.Drawing.FontFamily family,
    int style,
    float emSize,
    System.Drawing.Point origin,
    System.Drawing.StringFormat format
    );
AddString(String, FontFamily, Int32, Single, Point, StringFormat) - GraphicsPath.AddString メソッド (System.Drawing.Drawing2D) | Microsoft Learn
文字列を縁取りをして描画する - .NET Tips (VB.NET,C#...)
角丸 (Rounded corners)
rounded - winforms - How to draw a rounded rectangle in c# - Stack Overflowトラブル対処法
描画時にちらつく
次の3つの解決法があります。
- ダブル バッファリングを有効にする。
DoubleBufferedプロパティがprotectedのため、それを継承したクラスを作成した上でDoubleBufferedをtrueとします。
DoubleBuffered = true;
またはリフレクションによりprotectedなプロパティを書き替えます。
PropertyInfo property = typeof(Control).GetProperty("DoubleBuffered", BindingFlags.Instance | BindingFlags.NonPublic);
property.SetValue(control, true);
- ControlStyles.Opaqueをtrueに設定し、背景の消去を無効にする。
ControlのSetStyle()も同様にprotectedのため、継承したクラスを作成した上で設定します。.NET TIPS:背景の描画を禁止して再描画時のちらつきをなくすには? - @IT 遠藤孝信 (2004/08/19)
SetStyle(ControlStyles.Opaque, true);
- 親クラスのOnPaintBackground()が呼び出されないようにし、背景の消去を無効にする。
コントロールのリサイズ時に一部しか再描画されない
次の2つの解決法があります。
- ControlStyles.ResizeRedrawをtrueに設定し、コントロールのリサイズ時に全体が再描画されるようにする。
- Resizeイベント発生時にInvalidate()で描画領域の全体を無効化し、全体が再描画されるようにする。
参考
- @IT:.NET TIPS ウィンドウのリサイズ時に再描画を行うには? - C# VB.NET Windowsフォーム デジタルアドバンテージ (2004/07/30)
参考
- グラフィックスと描画 - Windows Forms .NET Framework | Microsoft Learn
- System.Drawing 名前空間 | Microsoft Learn
- System.Drawing.Drawing2D 名前空間 | Microsoft Learn (2次元ベクター グラフィックス)
- System.Drawing.Imaging 名前空間 | Microsoft Learn (イメージング)
- System.Drawing.Text 名前空間 | Microsoft Learn (タイポグラフィ)
参考書
- C#によるプログラミングWindows 下 [日経BP] Charles Petzold
3部「グラフィック」